How to Build a Subgraph on Fantom
Once upon a time, the internet revolutionized the world as we knew it, turning it from a static, disconnected place into a digital playground where people could share information and connect with each other from all corners of the globe. But with great possibilities came a great problem: how to organize all the new information flooding the web.
Back then, it was like trying to find a needle in a haystack. You had to rely on bookmarks and recommendations to navigate your way through the endless sea of websites. But thanks to Google and other search engines, we were able to breathe a sigh of relief and find what we were looking for with a simple search.
Fast-forward to today, and we're in the midst of another digital revolution - Web3. This new era of the internet is all about decentralization and openness, by storing data on a public ledger. But it has its own set of challenges. Namely, how to access the vast amount of blockchain data that is being generated every second.
What good is a public ledger if you can’t read it? That's where The Graph comes in. This innovative protocol uses powerful incentives on top of a decentralized network to index and serve blockchain data to users in a practical and efficient manner. It's like having a super-powered search engine for the decentralized web, and it's changing the game for blockchain developers and enthusiasts alike.
— Introducing The Graph on Fantom
— Benefits for the Fantom ecosystem
— How to create a subgraph on Fantom
Introducing The Graph on Fantom
The Graph is a decentralized protocol that enables anyone to access blockchain data by querying open APIs called subgraphs. Independent network participants coordinate and contribute to the network.
Network participants work together to provide data to end users in exchange for GRT rewards. GRT is the work utility token that coordinates data providers and consumers. GRT serves as a utility for coordinating data providers and consumers within the network and incentivizes protocol participants to organize data effectively.
Network participants include:
- Subgraph developers: create and publish subgraphs that can be queried by anyone
- Indexers: operate nodes to index subgraphs, and serve data to consumers
- Curators: identify & curate valuable subgraphs for Indexers
- Delegators: help secure the network by delegating GRT to Indexers
Open access to data is crucial for the growth and success of Web3, and The Graph plays a pivotal role in enabling this access. By empowering an independent data marketplace, The Graph allows developers and users to access blockchain data without any restrictions or gatekeepers.
This open access to data not only fosters innovation and collaboration but also ensures transparency and accountability. The Graph democratizes access to information and empowers individuals and communities to participate in the Web3 revolution without being beholden to centralized entities. Open access to data is vital for the long-term sustainability of Web3, and The Graph is a key enabler of this vision.
Benefits for the Fantom ecosystem
The Fantom ecosystem will benefit by using The Graph to access blockchain data. The decentralized network is not controlled by a single entity, reducing the risk of censorship and enhancing transparency and accountability.
The Graph is powered by hundreds of independent Indexers across the world, guaranteeing robust and reliable access to data any time you need it. Data performance on The Graph is significantly better when compared to operating your own hardware. And performance on the decentralized network will only continue to increase thanks to the ongoing contributions from The Graph community.
Subgraphs are the industry standard for accessing blockchain data, and can power all the data needs for your dApp’s front end. Hundreds of dApps are using subgraphs to serve data to users already, with billions of queries being made to the network.
Here’s how you can begin using subgraphs to make your dApp’s data truly unstoppable.
How to create a subgraph on Fantom
This guide will quickly take you through how to initialize, create, deploy, and publish your Fantom network subgraph on The Graph’s decentralized network.
This guide is written assuming that you have:
- A link to a smart contract deployed to Fantom network
- GRT to curate your subgraph
- A crypto wallet
0. Go to Subgraph Studio and create new subgraph
Go to Subgraph Studio and connect your wallet.
Once connected, you can begin by clicking “create a subgraph.” Select Fantom as the network and click continue.
1. Install The Graph CLI
The Graph CLI is written in JavaScript and you will need to have `npm` or `yarn` installed to use it.
On your local machine, run one of the following commands:
```sh

# NPM

$ npm install -g @graphprotocol/graph-cli

# Yarn

$ yarn global add @graphprotocol/graph-cli

```
2. Initialize your Subgraph
Initialize your subgraph from an existing contract by running the following command:
```sh

graph init --studio <SUBGRAPH_SLUG>

```
The Graph CLI will ask you to enter information.
- Protocol: select Ethereum because Fantom is EVM-compatible
- Subgraph slug: create a name for your subgraph. Your subgraph slug is an identifier for your subgraph.
- Directory to create the subgraph in: choose your local directory
- Ethereum network: fantom
- Contract address: Locate the address of the smart contract you’d like to query data from on FTMScan
- If the ABI is not autopopulated, you will need to input it manually as a JSON file
- Start Block: it is suggested that you input the start block to save time while your subgraph indexes blockchain data. You can locate the start block by finding the block where your contract was deployed.
- Contract Name: input the name of your contract
- Index contract events as entities: it is suggested that you set this to true as it will automatically add mappings to your subgraph for every emitted event
- Add another contract: you can optionally add another contract
- Once you have completed this step, the graph CLI will prompt you with next steps
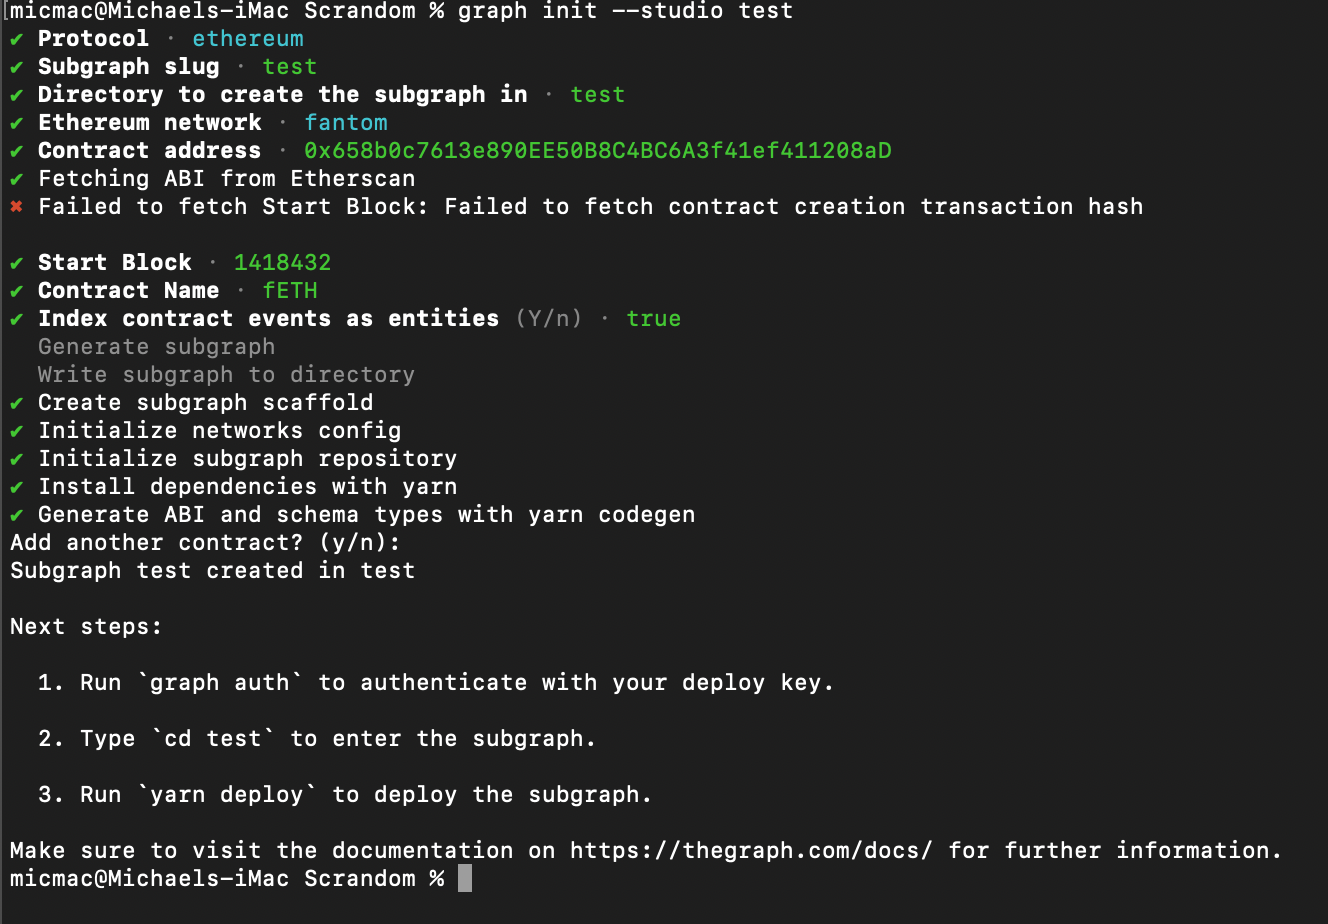
Here is an example using the fETH token address:
3. Write your Subgraph
The previous commands create a scaffold subgraph that you can use as a starting point for building your subgraph. This scaffold is already very useful. That being said, you might want to make changes to the subgraph, you will mainly work with three files:
- Manifest (subgraph.yaml) - The manifest defines what data sources your subgraphs will index.
- Schema (schema.graphql) - The GraphQL schema defines what data you wish to retrieve from the subgraph.
- AssemblyScript Mappings (mapping.ts) - This is the code that translates data from your data sources to the entities defined in the schema.
For more information on how to write your subgraph, see this page.
4. Deploy to the Subgraph Studio
Once your subgraph is written, run the following commands:
```sh

$ graph codegen

$ graph build

```
The ‘graph codegen’ command will generate AssemblyScript types for smart contract ABIs and the subgraph schema.
The ‘graph build’ command will compile your subgraph to WebAssembly
Next, authenticate and deploy your subgraph to a Graph Node. The deploy key can be found on the subgraph page in Subgraph Studio.
```sh

$ graph auth --studio <DEPLOY_KEY>

$ graph deploy --studio <SUBGRAPH_SLUG>

```
You will be asked for a version label. It's strongly recommended to use semver for versioning like `0.0.1`. That said, you are free to choose any string as version such as:`v1`, `version1`, `asdf`
5. Test your Subgraph
You can test your subgraph by making a sample query in the playground section.
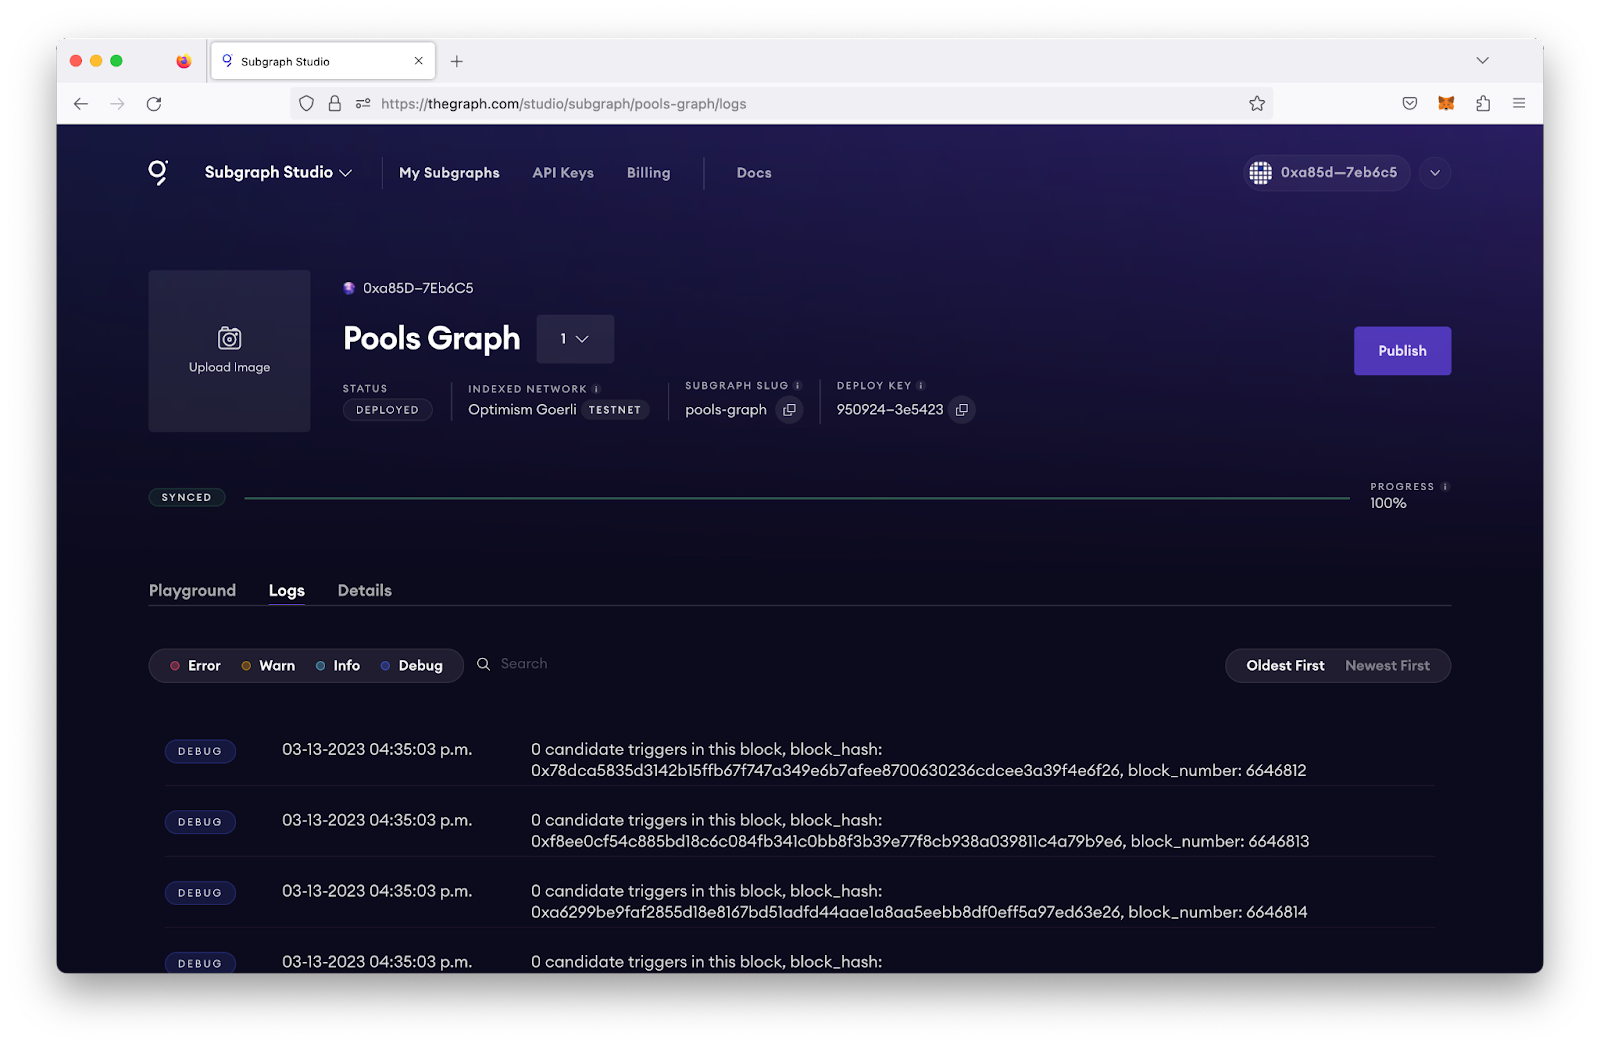
The logs will tell you if there are any errors with your subgraph. The logs of an operational subgraph will look like this:
If your subgraph is failing, you can query the subgraph health by using the GraphiQL Playground. Note that you can leverage the query below and input your deployment ID for your subgraph. In this case, `Qm...` is the deployment ID (which can be located on the subgraph page under **Details**). The query below will tell you when a subgraph fails, so you can debug accordingly:
```sh

{
  indexingStatuses(subgraphs: ["Qm..."]) {
    node
    synced
    health
    fatalError {
      message
      block {
        number
        hash
      }
      handler
    }
    nonFatalErrors {
      message
      block {
        number
        hash
      }
      handler
    }
    chains {
      network
      chainHeadBlock {
        number
      }
      earliestBlock {
        number
      }
      latestBlock {
        number
      }
      lastHealthyBlock {
        number
      }
    }
    entityCount
  }
}

```
6. Publish your Subgraph to The Graph’s decentralized network
Once your subgraph has been deployed to the Subgraph Studio, you have tested it out, and are ready to put it into production, you can then publish it to the decentralized network.
In the Subgraph Studio, click on your subgraph. On the subgraph’s page, you will be able to click the publish button on the top right.
Select the network you would like to publish your subgraph to. It is recommended to publish subgraphs to Arbitrum One to take advantage of the faster transaction speeds and lower gas costs.
Before you can query your subgraph, Indexers need to begin serving queries on it. In order to streamline this process, you can curate your own subgraph using GRT.
At the time of writing, it is recommended that you curate your own subgraph with 10,000 GRT to ensure that it is indexed and available for querying as soon as possible.
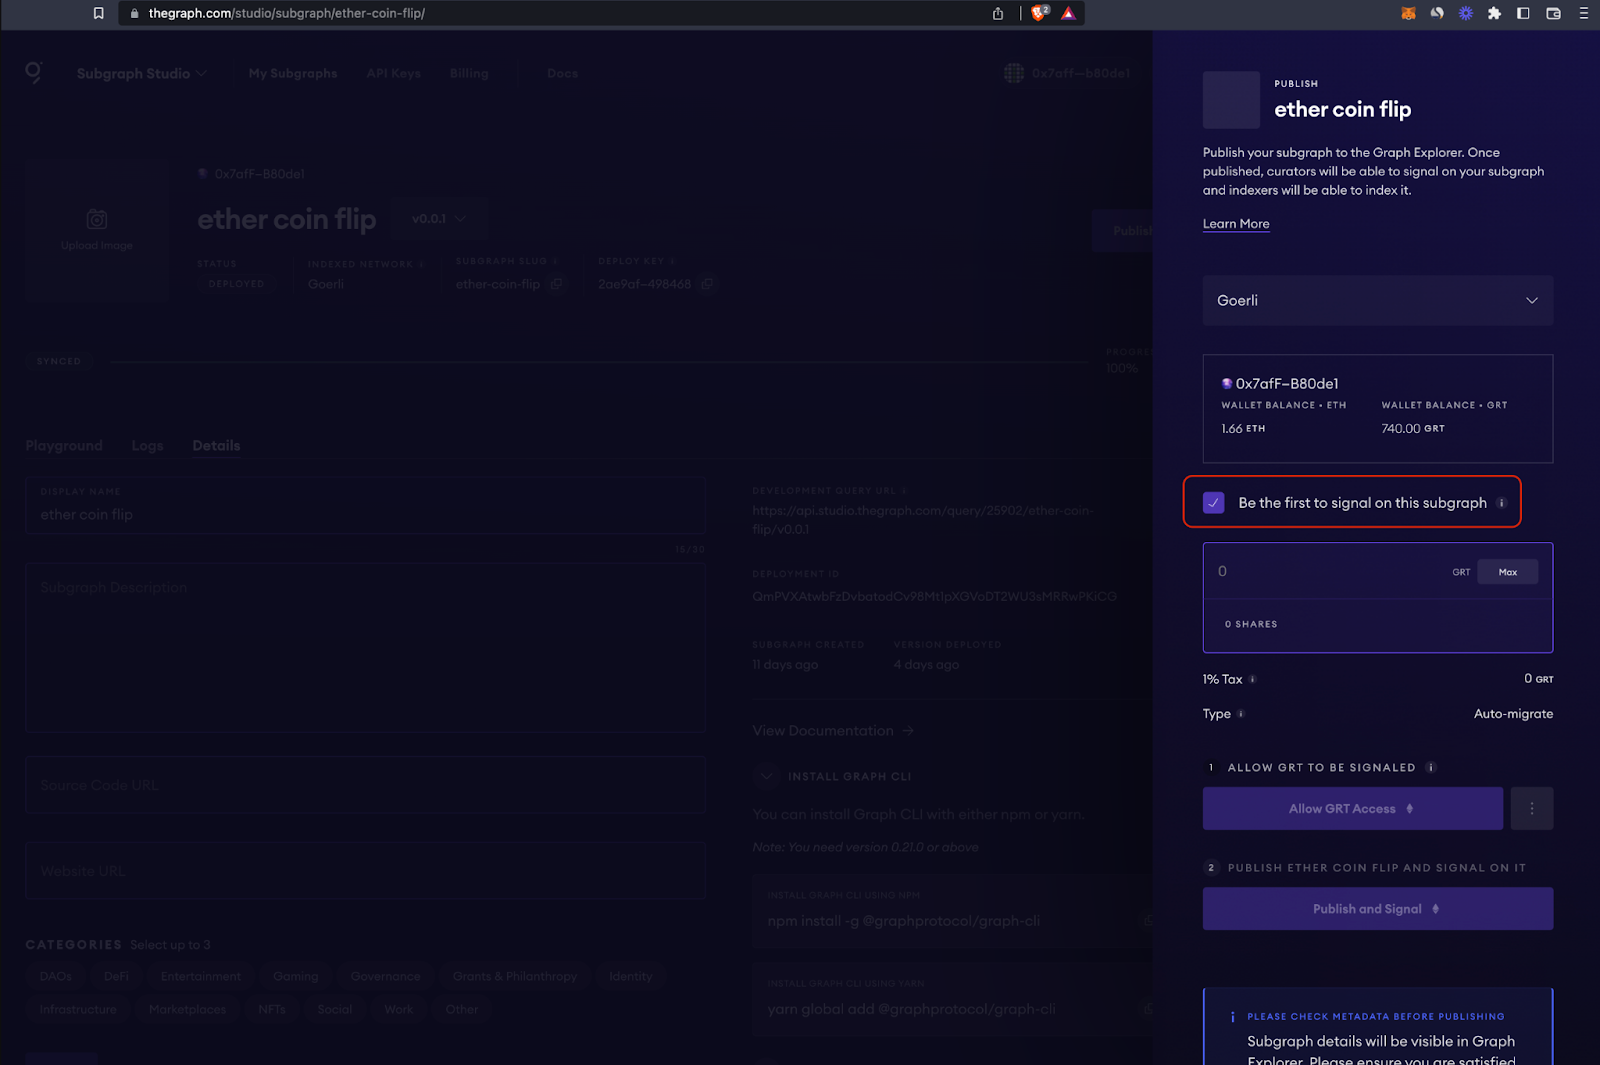
To save on gas costs, you can curate your subgraph in the same transaction that you published it by selecting this button when you publish your subgraph to The Graph’s decentralized network:
7. Query your Subgraph
Now, you can query your subgraph by sending GraphQL queries to your subgraph’s Query URL, which you can find by clicking on the query button.
You can query from your dApp if you don't have your API key via the free, rate-limited temporary query URL that can be used for development and staging.
For more information about querying data from your subgraph, read more here.